

It is assumed that you already have Domain Name and Web Hosting bought from GoDaddy and now I will guide you how to link Domain Name with Web Hosting on GoDaddy and how to install wordpress on a GoDaddy Website. If you are directly viewing this page, I suggest you to read our articles on How to buy a New Domain from GoDaddy and How to buy Web Hosting from GoDaddy. You are almost done with the procedure to start your own blog and only few steps away which are most important. Many people stuck here to associate Domain Name with Web Hosting so, here is the guide to made it easy to associate Domain Name with Web Hosting on GoDaddy for WordPress website.
How to Install WordPress for a New Website from GoDaddy
So to start with, log in to your GoDaddy account with the username you have created and under My Products you will see your Domains, Web Hosting, Workspace Email and Photo Album. Under Domains you will see all your Domains. You will see Manage button beside Web Hosting option. Click on it to link Web Hosting with Domain Name. In the Next screen, you can associate your Domain Name with Web Hosting and you will be asked to enter cPanel Username and Password. Do remember these cPanel credentials, as these are useful to install WordPress for your Website.
Once you have associated your Domain Name with Web Hosing, now the only step which is remaining is to install wordpress for your Website. You can install wordpress for your website after creating cPanel account so login to your cPanel to install WordPress for your Website.
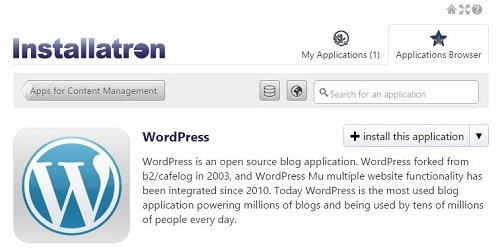
After logging into your cPanel, under Web Applications you will see WordPress, click on it to take you to a page where you can proceed to install WordPress on Website on GoDaddy. Click on Install this application button. Now here is the most important step of wordpress installation for new website on GoDaddy.

Under Location, choose your Domain Name, I suggest you to choose the one without www and leave the Directory option blank. Lave all the other fields with the default options and scroll down to see Settings. Here you need to choose Administrator Username, Administrator Password and the email.
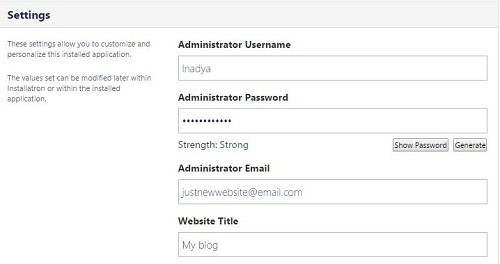
These are the credentials which you will use to login to the WordPress Dashboard to edit your Website. Enter the Website Title field as this is the name which you will see after wordpress installation, of course you can change it later. Now come down and click on Install button to proceed with the installation of WordPress.
You are done with the installation of wordpress on your website and now your new website is ready to launch, login to the admin panel of the wordpress and launch your website and customize your website from there. You can install the theme you want and widgets of your wish and the plugins you need. Login to the admin Dashboard of your website with www.xyz.com/wp-admin and start editing your website.


